How to Automate Airtable Workflows Using n8n
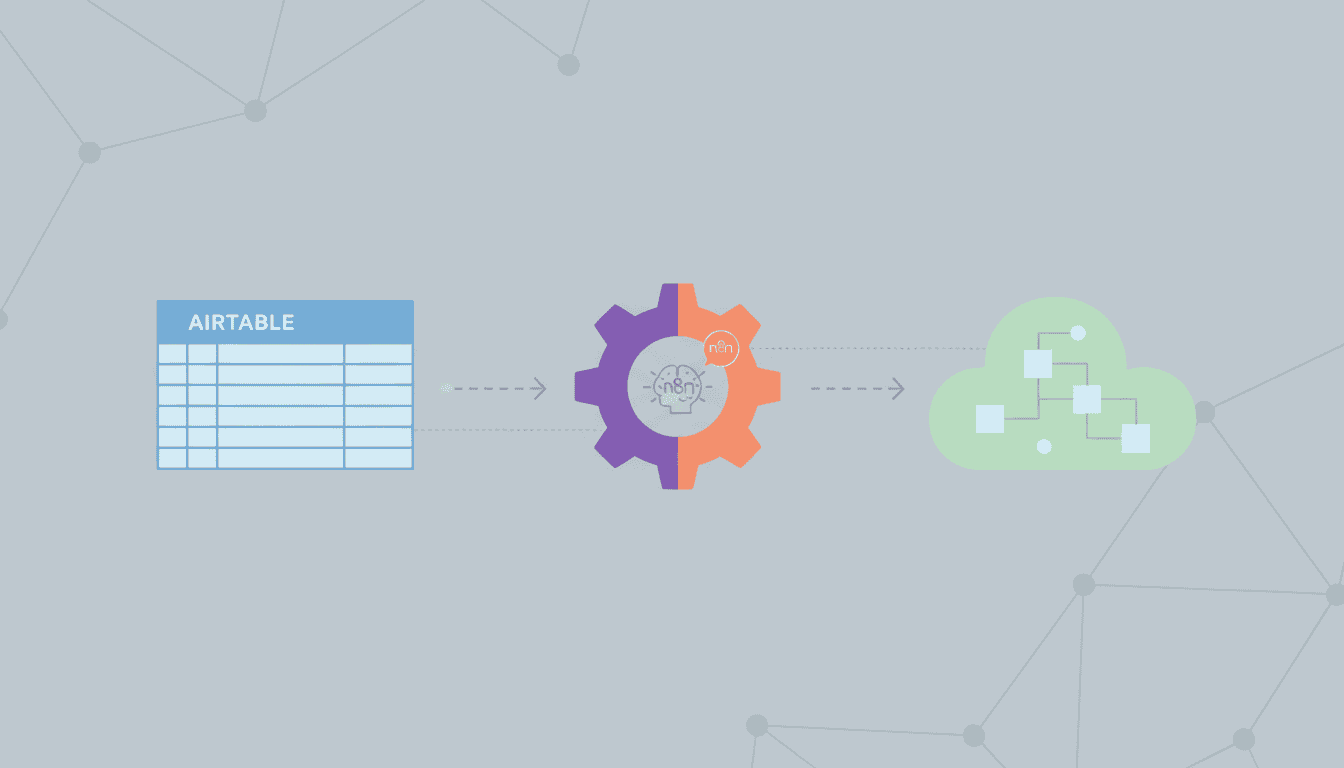
Airtable has become a go-to solution for teams and businesses looking to organize their data in flexible, customizable ways. However, to truly unlock its potential, automation is key. That’s where n8n comes in – a powerful workflow automation tool that can transform how you work with Airtable. In this guide, we’ll explore how to automate Airtable workflows using n8n, enabling you to save time, reduce manual data entry, and create seamless processes across your applications.
Whether you’re looking to automatically update records, sync data between systems, or trigger actions based on Airtable changes, n8n provides the flexibility and power to make it happen. Let’s dive into how you can set up these automations and revolutionize your Airtable experience.
Setting Up n8n for Airtable Automation
Before you can start building automated workflows between Airtable and other services, you’ll need to set up n8n and connect it to your Airtable account. This foundation is essential for any n8n Airtable automation you plan to create.
Creating an n8n Account
To begin your automation journey, you’ll first need to set up n8n. Here’s how to get started:
- Visit the n8n website and sign up for an account
- Choose between n8n Cloud (hosted solution) or self-hosted installation
- For n8n Cloud, complete the registration process with your email and password
- If you prefer self-hosting, follow the installation instructions for your preferred platform (Docker, npm, etc.)
- Once installed, access the n8n interface through your browser
Connecting n8n to Airtable
Once you have n8n set up, the next step is to establish a connection with your Airtable account. This connection will enable the airtable sync n8n functionality that powers your automations:
- In the n8n workflow editor, click on “Add node”
- Search for “Airtable” and select it from the list
- Click “Create new” under Credentials
- You’ll need your Airtable API key, which you can find in your Airtable account under Account Overview > API
- Enter your API key in the credentials dialog
- Name your credentials for future reference
- Test the connection to ensure it works properly
- Save your credentials
With this connection established, n8n can now communicate with your Airtable bases and tables, allowing you to build powerful automations.
Building Your First n8n Airtable Workflow
Now that you have n8n connected to Airtable, it’s time to create your first workflow. An n8n airtable workflow consists of a trigger (what starts the workflow) and one or more actions (what happens when the workflow runs).
Choosing the Trigger for Your Workflow
The trigger determines when your workflow will execute. Here are some common triggers for Airtable automations:
- Scheduled trigger: Run your workflow at specific intervals (hourly, daily, etc.)
- Webhook trigger: Execute when an external system sends data to a specific URL
- Manual trigger: Start the workflow manually when needed
- Polling trigger: Check for new or updated records in Airtable at regular intervals
To set up a trigger:
- Create a new workflow in n8n
- Add your first node (this will be your trigger)
- Select the trigger type that best suits your needs
- Configure the trigger’s settings according to your requirements
For example, if you want to run a workflow every day at 9 AM to process new Airtable records, you would use the Schedule trigger and set it to run at that specific time.
Setting Up Actions in Your Workflow
After setting up your trigger, you need to define what happens when the workflow runs. This is where you’ll configure the Airtable actions:
- Add an Airtable node after your trigger
- Select the operation you want to perform (e.g., “Read records,” “Create record,” “Update record”)
- Choose the base and table you want to work with
- Configure the operation parameters
For example, to automate Airtable rows by updating them based on specific conditions:
- Use the Airtable node with the “Read records” operation to fetch records matching certain criteria
- Add a Function node to transform or process the data if needed
- Add another Airtable node with the “Update record” operation
- Map the record ID and the fields you want to update
Implementing Airtable Database Automation
Airtable database automation can transform how you manage data by eliminating repetitive tasks and ensuring consistency across your information systems.
Using n8n to Automate Data Entry
Manual data entry is time-consuming and error-prone. Here’s how n8n can help automate this process:
| Use Case | Implementation |
| Form submissions to Airtable | Use Webhook node to receive form data, then Airtable node to create new records |
| Import CSV data | Use Read Binary Files node for CSV input, then CSV Parse node to structure data, followed by Airtable node to insert records |
| Copy data between systems | Use nodes for external systems (like Google Sheets, CRM systems) to read data, then Airtable node to create or update records |
For example, you could set up an AI agent workflow that monitors customer inquiries, extracts relevant information, and automatically creates new records in your Airtable customer database.
Scheduling Regular Airtable Syncs
Keeping data synchronized between Airtable and other systems is crucial for maintaining data integrity. Here’s how to implement airtable sync n8n workflows:
- Create a workflow with a Schedule trigger (e.g., every hour)
- Add nodes to fetch data from both systems
- Use Function nodes to compare and identify differences
- Add nodes to update records as needed in either system
This approach is particularly useful for:
- Syncing inventory between Airtable and your e-commerce platform
- Keeping customer data consistent between Airtable and your CRM
- Updating project status across different project management tools
With n8n’s flexible architecture, you can create sophisticated sync mechanisms that handle complex business rules and data transformations.
Advanced Techniques for n8n and Airtable
Once you’re comfortable with basic automations, you can explore more advanced techniques to make your workflows even more powerful.
Using Webhooks for Instant Airtable Updates
While scheduled syncs are useful, sometimes you need real-time updates. Webhooks provide a way to trigger workflows instantly when events occur:
- Create a workflow that starts with a Webhook node
- Configure the webhook to receive data in the format you expect
- Process the incoming data as needed
- Use Airtable nodes to update or create records based on the webhook data
This approach allows external systems to push data to your n8n workflow, which then updates Airtable immediately. For instance, you could set up a webhook that receives notification when a payment is processed, then automatically updates the customer’s payment status in Airtable.
Error Handling in n8n Workflows
Robust workflows need proper error handling to ensure reliability. Here’s how to implement error handling in your n8n workflows:
- Error Trigger nodes: Add these to execute specific actions when errors occur
- If nodes: Use conditional logic to handle different scenarios
- Try/Catch: Implement this pattern using a combination of IF and Error Trigger nodes
- Notification nodes: Add Email, Slack, or other notification nodes to alert you when errors occur
These advanced techniques can help you build more resilient workflows that handle exceptions gracefully, especially when dealing with n8n workflow examples for small businesses where reliability is critical.
Resources
Useful Links for n8n and Airtable
Here are some valuable resources to help you further develop your n8n and Airtable automation skills:
- n8n Official Airtable Integration Documentation
- Airtable API Documentation
- What is n8n – A comprehensive introduction to n8n’s capabilities
- n8n Workflow Templates – Pre-built workflows you can adapt for your needs
- Airtable API Community Forum – Discussions about Airtable API usage
Community Forums for Troubleshooting
When you encounter challenges with your automations, these community resources can provide assistance:
- n8n Community Forum – Connect with other n8n users and get help
- Airtable Community – Discuss Airtable features and integrations
- n8n GitHub Issues – Report bugs or check existing issues
- Stack Overflow Airtable Tag – Technical questions and solutions
- AI Agent for Small Business – Learn how to enhance your Airtable workflows with AI capabilities
Conclusion
Automating Airtable workflows with n8n offers tremendous potential for improving efficiency, reducing manual work, and ensuring data consistency across your organization. By following the steps outlined in this guide, you can create powerful automations that transform how you work with Airtable.
Starting with basic connections and gradually advancing to more sophisticated workflows, you can build a custom automation ecosystem tailored to your specific needs. The flexibility of n8n means you’re not limited to what’s available out-of-the-box – you can create exactly the workflows you need.
Remember that automation is an iterative process. Start small, test thoroughly, and gradually expand your workflows as you become more comfortable with n8n’s capabilities. With practice, you’ll be able to automate increasingly complex processes, freeing up your team to focus on what matters most in your business.
Frequently Asked Questions
Is n8n free to use with Airtable?
n8n offers both free and paid options. You can use the open-source version for free if you self-host it, or opt for n8n Cloud with a free tier for basic automation needs. For more advanced features and higher usage limits, paid plans are available.
Do I need coding skills to create n8n workflows for Airtable?
No, you don’t need coding skills to create basic workflows. n8n provides a visual interface where you can connect nodes and configure them without code. However, for more advanced data transformations, basic JavaScript knowledge can be helpful when using Function nodes.
How often can I sync data between Airtable and other systems?
With n8n, you can sync as frequently as needed. You can set up schedules ranging from every minute to specific days of the week or month. For real-time updates, webhook triggers can be implemented to sync data instantly when changes occur.
Can I automate creating records in multiple Airtable bases?
Yes, you can automate creating records across multiple Airtable bases. Simply add multiple Airtable nodes to your workflow, each configured to work with a different base. You can then route data to each base as needed.
What happens if my n8n workflow encounters an error?
If your workflow encounters an error, n8n will log the error and can notify you if you’ve set up error handling. You can implement custom error handling using Error Trigger nodes to perform specific actions when errors occur, such as sending notifications or executing fallback procedures.
Can I use n8n to migrate data from other databases to Airtable?
Yes, n8n is excellent for data migration tasks. You can connect to various database sources (MySQL, PostgreSQL, MongoDB, etc.), extract the data, transform it as needed, and then import it into Airtable. This can be done as a one-time operation or as an ongoing synchronization.